JD / 02 — Review the sample
How to review your first custom jersey sample
Turn first impressions into a clear record of measurements, decisions and changes.
Your first jersey sample gives you something physical to discuss. Start by checking what this sample was made to test: fit, construction, material, graphics, or a combination. A fit sample in a temporary fabric cannot answer every question about the finished garment. Keep the agreed brief beside you and record the review before approving the next step.
Review the neckline and back artwork separately
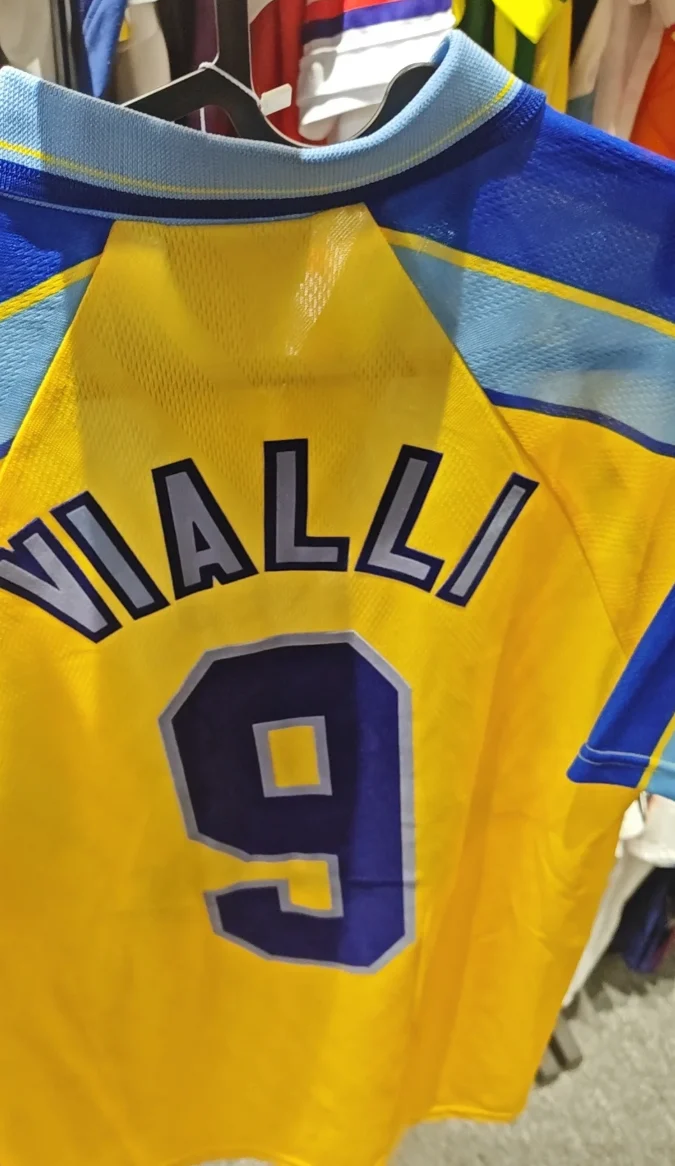
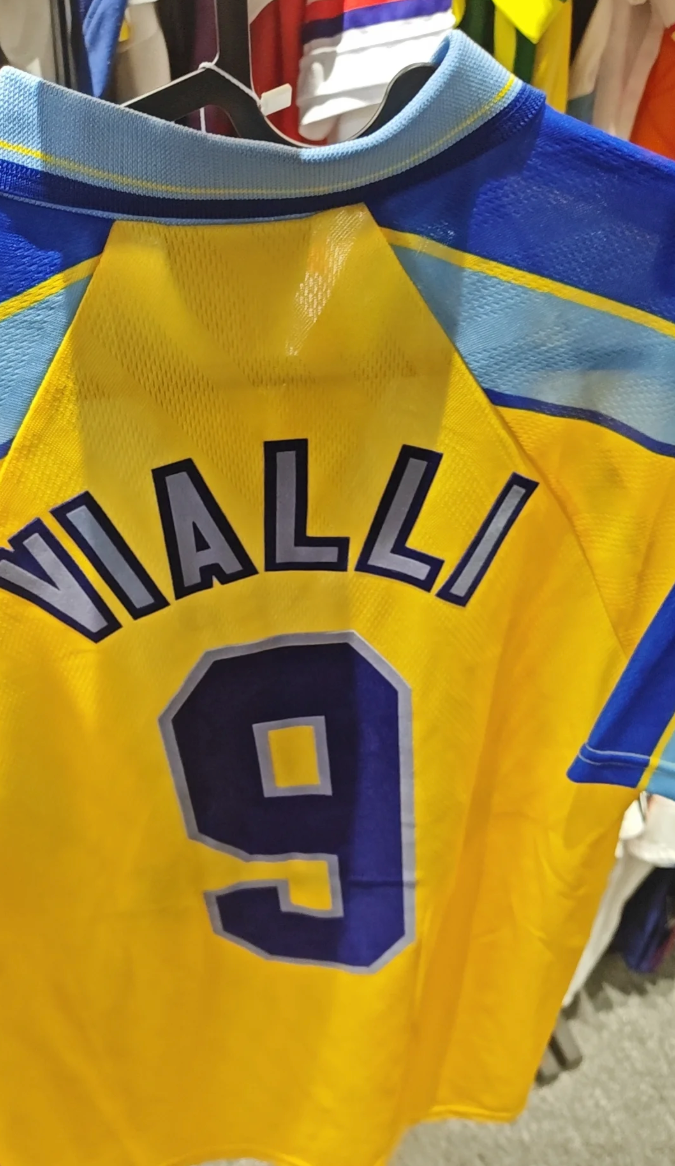
This back view shows the neck trim, colour joins and the relationship between the name and number. Review them separately so each comment has a clear reference point.
Three things to record on the sample
- Photograph the neckline and shoulder joins from front and back; mark any difference from the design you agreed.
- Measure the name and number separately, stating the reference seam and the gap between the two artwork elements.
- Check the neckline when putting on and moving in the sample; record what feels tight or loose and your requested change.
For measurement approval, lay the sample flat and use the agreed reference points; this hanging view has no reliable scale.
1. Identify the sample and its purpose
Give the sample a simple reference, such as “sample 01”, and record the date, size, colourway and artwork version. List any agreed substitutions: temporary labels, a different colour or an unfinished detail. This prevents a known placeholder from being confused with a mistake. If you do not know what a detail represents, ask before treating it as final.
2. Compare measurements using the same method
Lay out the jersey and use the measurement points agreed in the brief. Record the unit and whether a number describes a flat garment measurement, a circumference or a body measurement. Compare like with like. For example, a flat chest width should not be compared directly with the wearer’s chest circumference.
- Record the agreed target and the observed sample measurement in separate columns.
- Photograph the measuring position when the start or end point could be unclear.
- Mark missing targets as “to confirm”; do not invent a tolerance or assume every difference is acceptable.
3. Describe fit with specific observations
Try the sample in the way you expect it to be worn, including a layer underneath if that is part of the design. Note where the shoulder sits, the body length and the room around the chest and sleeves. Describe what happens when you sit or move your arms. “The hem rises when I lift my arms” gives a clearer starting point than “the fit is wrong”. A review of one size does not establish the fit of every production size.
4. Review graphics and finishing separately
Check front and back artwork against the intended file version. Note its width, height and position from a named reference point, then look at the collar, cuffs, labels and packaging items included in the sample brief. Compare physical colour or fabric references where those have been agreed. A screen image alone cannot confirm the feel of the fabric or settle a physical colour approval.
If you want a change, separate the observation from the instruction. For illustration, “move the chest graphic 2 cm higher than sample 01, keeping its width unchanged” names both the change and what stays the same. That number is an example, not a recommended placement for your jersey.
5. Keep one revision table
Use one review document for the people making the decision. Collect conflicting feedback before sending the final list, and add a photo reference to each item that needs one. This blank table can be copied into your own document:
| Item / photo | Agreed target | Observation | Next action |
|---|---|---|---|
| ______ | ______ | ______ | ______ |
| ______ | ______ | ______ | ______ |
Label each action as a correction against the agreed brief, a new design request or an open question. A new fabric, graphic or construction request may change the work still required; ask how that affects the next sample, cost and timing rather than assuming it is included.
6. State exactly what you are approving
Finish with three lists: approved details, required changes and unresolved questions. Identify the person confirming and the review version. Approval of the fit or graphic position is not automatically approval of all materials, all sizes or a production run. Ask which updated files or sample checks are needed before the next decision.
If you are preparing a first sample or need to organise the next revision, explore sample development at Jerseys Deliver. Our Guangzhou studio can review the design and the information needed for the next step; quantities, costs and dates depend on the project requirements.
Record the review conditions
Identify the sample, base and artwork version. For colour review, keep an agreed physical reference and note lighting and surroundings; a photograph, screen or lighting change can alter appearance. If a decision is made from photographs, record that limitation with the approval.
For repeatable measurements, describe the surface, garment placement, start and end points and whether tension is applied. Include a photograph showing those points and the reading. The Proper Cloth example concerns a shirt: suitable jersey reference points need agreement rather than automatic copying. This guide sets no tolerance shared by all garments.
| Observation | Review conditions | Limit or pending detail |
|---|---|---|
| Colour | Reference and lighting: ___ | Photo or physical sample: ___ |
| Measurement | Points, placement and tension: ___ | Value, unit and photo: ___ |
| Seam | Area; inside/outside: ___ | Requested change: ___ |
Separate the seam construction from the stitch
At the collar, armhole, side or hem, photograph inside and outside and describe puckering, loose threads or a visible opening. The way pieces are joined and the stitch used are separate details. A photograph locates an observation but does not prove strength, durability or compliance with a standard. If testing is needed, agree its method, scope and responsible party separately.
Continue with: Artwork and placement.
References informing these questions: X-Rite; Madeira; Proper Cloth; Coats Group.
Additional questions from communities and videos: Condé Systems; Proper Cloth. Research used text or captions; archived records do not verify a thread’s current state. These are not site customers, demand statistics or evidence about our garments.
Sources and editorial approach
This is an original Jerseys Deliver checklist. Its research references are Apparel Entrepreneurship’s general tech pack tutorial, reviewed through English automatic captions, and CarmelElite6’s public sample discussion about graphic placement. They are external examples, not our projects or evidence of our production results. The tutorial creator also sells templates.
GUANGZHOU / JERSEYS DELIVER
Give your project a direction.
Share your references and the decisions still open. We start by understanding your design and the scope of the project.
Jerseys Deliver / Studio notes
Keep your project moving
Prepare the design
How to prepare a custom jersey brief
A practical checklist to organise design decisions and review your sample before the next step.
Read the guideOrganise the enquiry
What to prepare for a custom jersey quote
Organise quantities, sizes and colourways so the project scope is clear from the first enquiry.
Read the guide
Prepare the artwork
Preparing jersey artwork and confirming print placement
A mockup starts the conversation. Give every badge, name and number a file version, a physical size and a position that can be checked on the jersey.
Read the guide
Review the team roster
Team roster handoff: names, numbers and versions before production
One design can have many variations. Connect every garment to its exact text, number, size and version so personalisation can be checked before production.
Read the guide